Showing posts with label IT tips. Show all posts

Wednesday, December 12, 2012

Cara Mempercepat Koneksi Internet

Cara Mempercepat Koneksi Internet

Cara mempercepat koneksi internet ini kami berikan buat anda yang sangat membutuhkan suatu koneksi yang super kilat, supaya aktifitas browsing di internet semakin ngebut. Koneksi internet yang cepat sangat diminati oleh para pengguna internet, termasuk anda juga mau kan ?
Tentunya kalian suka merasa kesal apabila hendak mendownload suatu file idm ataupun smadav, tetapi koneksi internet yang anda gunakan lelet bahkan sampai gagal gara-gara koneksi yang tidak mendukung.
Nah, dengan menggunakan tips dan trik cara mempercepat koneksi internet dibawah ini kalian gak akan merasa kesal lagi karena akan membuat koneksi internet dirumah anda super cepat. Tips ini sangat cocok sekali buat mempercepat koneksi internet speedy, warnet, ataupun untuk modem smartfren, 3, telkomsel flash, flexi dan xl.
Berikut ini Kumpulan Tips dan Trik Cara Mempercepat Koneksi Internet
Cara Mempercepat Koneksi Internet Speedy
  • Masuk ke settingan modem, 192.168.1.1
  • Klik Advanced Setup
  • Klik ADSL > lalu pilih ADSL Mode, awalnya ADSL2+ ganti dengan G.DMT > SAVE
Cara Mempercepat Koneksi Internet Pada Windows 7 dan XP
  • Klik menu Start pada windows
  • Lalu Klik Run
  • Ketik gpedit.msc
  • ENTER
  • Lalu pilih Administrative Templates
  • Kemudian double click Network
  • Double click QoS Packet scheduler
  • Double click pada Limit reservable bandwidth
  • Ubah setting menjadi Enable
  • Kemudian ubah Bandwidth Limitnya menjadi 0
  • Klik Apply, OK
  • Kemudian restart komputer
Cara Mempercepat Koneksi Internet dengan DNS
  • Buka Control Panel
  • Pilih Network and Sharing Center
  • Klik Local Area Connection > Klik Properties
  • Pilih Internet Protocol (TCP/IP) > Klik Properties
  • Klik Use the following DNS server addresses
  • Isi Preferred DNS server dengan angka : 208.67.222.222
  • Isi Alternate DNS server dengan angka : 208.67.220.220
  • Klik OK
Google Public DNS is a free
8.8.8.8
8.8.4.4
DNS Open DNS
208.67.222.222
208.67.220.220
DNS DNSadvantage
156.154.70.1
156.154.71.1
DNS ScrubIt
67.138.54.100
207.225.209.66
Speedy Telkom DNS Server
202.134.2.5
203.130.196.5
202.134.0.155
202.134.1.10
202.134.0.62
202.159.32.2
202.159.33.2
202.155.30.227


Kata kunci terkait dengan postingan :
software untuk mengatur bandwidthcara membatasi kuota internetmembatasi bandwidth tanpa softwaremengatur bandwidth internetcara membatasi koneksi internet lancara membatasi bandwidth youtubemengatur bandwidth tanpa mikrotikcara membatasi bandwidth lanmembatasi kecepatan wificara membatasi bandwidthcara membatasi kecepatan internet, cara membatasi kecepatan wifimengatur bandwidth tanpa software, cara membatasi kecepatan internet wifiaplikasi untuk mengatur bandwidthcara membatasi koneksi internet wificara membatasi kuota wifimembatasi bandwidth youtubecara membatasi internetcara membatasi koneksi wificara batasi kecepatan wifimengatur bandwidth youtubecara membatasi koneksi internet tanpa softwarecara membatsi pemakaian bandwicth internetaplikasi untuk membatasi kuota internet di pccara membatasi koneksi youtubemembatasi youtube dengan sofware, cara menurunkan koneksicara membatasi kuota download internetmempercepat koneksi jaringan lokalcara membatasi akses internetwifisoftware cek pemakai badwith internetcara membatasi bandwith youtubemembatasi kuota internet pada komputermembatasi kouta lanmembatasi kecepatan koneksi internetmembatasi kecepatan internet wifimembatasi kecepatan akses internetmengurangi kecepatan wifi userprogram untuk mengatur bandwidthsoftware untuk mengatur bandwich internetmembatasi akses internet pada jaringan lanmembatasi akses internet di jaringan, kecepatan bandwidth youtubecek pemakaian bandwidth dalam jaringan lancara untuk membatasi internet melalui wifimembatasi kuota internet tanpa software di windows 7, mengurangi kecepatan sharing koneksisoftware untuk cek bandwith di jaringan lokalmempercepat koneksi jaringan lan pada domainmembatasi kuota internet tanpa software di windows 8membatasi kuota internet tanpa software di windows 10

Monday, December 3, 2012

Cara Mengatasi Masalah Speaker / Sound Device Tidak Terdeteksi

Cara Mengatasi Masalah Speaker / Sound Device Tidak Terdeteksi


Beberapa saat yang lalu, Windows XP SP3 saya mengalami masalah dengan sound, tiba-tiba suara computer menghilang. Windows gagal mengeluarkan suara baik untuk memutar file music ataupun menjalankan system sound (suara login, logout dll). Seperti Windows tanpa sound card, padahal tidak ada masalah apapun (conflict) di Device Manager -> Sound, video and game controllers. Permasalahan tidak berhenti saat menambahkan sound card eksternal (sebelumnya sound onboard). Kedua Device tersebut dikenali plus tidak ada masalah dengan driver. Tetapi masih tidak ada suara yang muncul.
  1. VIA AC’97 (onboard)
  2. Creative SoundBlaster (eksternal)
Sangkaan masalah terletak di sound card gugur karena 1.) setelah membeli sound card baru masalah tidak selesai sampai disitu 2.) Tidak ada masalah sound saat menggunakan Live CD Linux. Sehingga saya yakin bahwa masalah ada di Windows. Beberapa ciri-cirinya sebagai berikut :
  1. Muncul error 88780078 (Bad DirectSound Driver) pada saat memutar mp3.
  2. Hilangnya ikon volume di kanan taskbar.
  3. Di Control Panel -> Sound and Audio Device, muncul pesan No Audio Device dan pilihan di Device Volume, Speaker Settings dll. Yang terdisable.
  4. Pada tab sound di dxdiag, DirectX mengenali nama device sound lengkap dengan drivernya, tapi muncul error 88780078 pada saat melakukan test (DirectX Feature -> Test DirectSound)
  5. Di Device Manager, tidak ada conflict (tanda kuning atau merah) di device, tapi saat klik properties di device, lalu ke tab properties, Audio, MIDI, Mixer dan Line Input Device menunjukkan status yang sama : “Driver is enabled but not has been started.”
  6. Pada saat eksekusi sndvol32.exe di WINDOWS/system32, muncul pesan “There are no Active Mixer enabled bla bla”
Beberapa cara yang saya lakukan antara lain :
  1. Memastikan sound onboard terdisable di BIOS atau di Device Manager saat menggunakan sound card eksternal.
  2. Uninstall sound card di Device Manager, lalu scan for hardware changes agar Windows menginstal otomatis kembali.
  3. Mengganti tempat slot sound card eksternal (PCI).
  4. Uninstall driver sound lalu install kembali dengan driver terbaru.
  5. Buka run dan ketik services.msc, scroll ke bawah hingga menemukan Windows Audio, dam memastikan Startup Type adalah Automatic.
  6. Memastikan tidak ada program 3rd party (seperti SRS Audio Sandbox) tidak mengakibatkan konflink dengan sound card.
Tapi cara diatas belum juga mengembalikan suara PC saya. Adapun cara yang berhasil mengembalikannya adalah sebagai berikut :
  1. Buka Run, ketikkan set DEVMGR_SHOW_NONPRESENT_DEVICES=1
  2. Ketik devmgmt.msc untuk membuka Device Manager
  3. Disable sound device anda
  4. Di tab view, pilih Show Hidden Device
  5. Expand Sound, video and game controllers
  6. Perhatikan device yang ber-ikon pudar, uninstall device sebagai berikut : Microsoft Kernel Audio Splitter, Microsoft System Audio Device, Microsoft Wave Audio Mixer, Microsoft WINMM WDM Audio Compability Driver.
  7. Scan for Hardware Changes untuk menginstall ulang device diatas
  8. Lalu kembali enable sound device anda.
  9. Reboot Komputer
  10. Cek volume ikon di taskbar, atau di cp -> Sounds and Audio Devices sound card anda dikenali. Atau eksekusi sndvol32.exe di WINDOWS/system32 secara manual.
  11. Sound’s Back!
Ada satu cara lagi yang saya temukan pada saat browsing tentang masalah ini, well cara ini tidak berhasil mengembalikan suara PC saya, tapi layak anda coba jika cara-cara diatas tidak menunjukkan hasil.
  1. Cara dibawah ini untuk mengembalikan Plug and Play Software Device Enumulator yang hilang, sebelum itu, pastikan PaPSDE di Device Manager -> System devices tak ada.
  2. Browse WINDOWS/inf, sebelumnya pastikan hidden folder terlihat di explorer (control panel -> Folder Options-> view -> Hidden files and folder -> pilih Show hidden files and folder)
  3. Buka file Machine.inf, hapus value ini ExcludeFromSelect=*
  4. Save as dan letakkan di folder manapun.
  5. Buka control panel -> add hardware, klik next, pilih yes I have already bla bla
  6. Pilih add new hardware devices -> install manually from the list -> pilih system devices -> have disk, lalu browse folder tempat anda save Machine.inf yang telah dirubah tadi, klik ok dan biarkan Windows menginstall PapSDE.

Tambahan dari saya:

jika belum memakai device external ( masih onboard / bawaan PC ), coba pinjam dulu soundcard externalnya ke teman anda apakah berhasil atau tidak, jika berhasil silakan beli sound card yang cocok dengan komputer anda alhasil SOUND BACK


Kata kunci terkait dengan postingan :
software untuk mengatur bandwidthcara membatasi kuota internetmembatasi bandwidth tanpa softwaremengatur bandwidth internetcara membatasi koneksi internet lancara membatasi bandwidth youtubemengatur bandwidth tanpa mikrotikcara membatasi bandwidth lanmembatasi kecepatan wificara membatasi bandwidthcara membatasi kecepatan internet, cara membatasi kecepatan wifimengatur bandwidth tanpa software, cara membatasi kecepatan internet wifiaplikasi untuk mengatur bandwidthcara membatasi koneksi internet wificara membatasi kuota wifimembatasi bandwidth youtubecara membatasi internetcara membatasi koneksi wificara batasi kecepatan wifimengatur bandwidth youtubecara membatasi koneksi internet tanpa softwarecara membatsi pemakaian bandwicth internetaplikasi untuk membatasi kuota internet di pccara membatasi koneksi youtubemembatasi youtube dengan sofware, cara menurunkan koneksicara membatasi kuota download internetmempercepat koneksi jaringan lokalcara membatasi akses internetwifisoftware cek pemakai badwith internetcara membatasi bandwith youtubemembatasi kuota internet pada komputermembatasi kouta lanmembatasi kecepatan koneksi internetmembatasi kecepatan internet wifimembatasi kecepatan akses internetmengurangi kecepatan wifi userprogram untuk mengatur bandwidthsoftware untuk mengatur bandwich internetmembatasi akses internet pada jaringan lanmembatasi akses internet di jaringan, kecepatan bandwidth youtubecek pemakaian bandwidth dalam jaringan lancara untuk membatasi internet melalui wifimembatasi kuota internet tanpa software di windows 7, mengurangi kecepatan sharing koneksisoftware untuk cek bandwith di jaringan lokalmempercepat koneksi jaringan lan pada domainmembatasi kuota internet tanpa software di windows 8membatasi kuota internet tanpa software di windows 10

Wednesday, November 28, 2012

Ini software buat backup dan restore komputer. Jadi kalo mau install ulang ga pake lama. Temennya Norton Ghost, cuma yang ini lebih jago. Bisa buat di recover di komputer laen yang beda hardware. Jadi kalo mau install ulang komputer temen, pake sopware ini lebih cepat.

Kalo mau bikin master, disarankan agar udah lengkap dengan programnya, jadi tinggal recover semua udah ada. Dari pengalaman, saya install ulang komputer / laptop client pake ini ga sampe 3 menit selesai. Udah lengkap dengan program2nya. Tinggal install driver Doang.

Biasanya untuk install di butuhkan waktu sekitar 5 menit. Bayangkan kalo anda teknisi di suruh menginstall 10 computer ? cara Normal dengan CD biasa memakan waktu mininmal 2 jam untuk install OS + Program2 nya. Tapi dengan cara ini, ga sampe 10 menit sudah selese. Jadi 10 komputer bisa selesai dalam waktu 100 menit (1,5 jam). Dibandingkan manual, (20 jam <-- Seharian Tuh).
INSTALASI
Kayaknya ga ada yang perlu di ajarin install. Biasa aja prosedurnya.
Setelah di extract jalankan :

workstation.11133.eng.32bit.reg (kalo OS 32 bit)
workstation.11133.eng.64bit.reg (kalo OS 64 bit) <-- Belum pernah nyoba

Setelah itu jalankan :
BackupRecovery.11133_s_en.exe

Pilih Install... Setelah itu prosedur standard Next, Next, Finish
PERHATIAN !!! PASTIKAN AGAN MENGINSTALL SEMUA KOMPONEN
Ada 2 Cara utama untuk BACKUP & RESTORE, yaitu : Under Windows (lewat programnya langsung) atau lewat standalone, lewat bootable device.

Kita akan fokus kepada cara yang kedua karena yang pertama menurut saya cukup gampang.

PERTAMAX
Siapkan bootable device, terserah, mau pake flashdisk atau cd, kalo ane lebih suka flashdisk, jadi siapkan flashdisk, minimal 4 GB, biar PUAS. Kalo mau hemat, minimal yang 128 Mb juga boleh , Setelah siap langsung colok di lubang USB jangan lubang yang laen.

KEDUAX
Jalankan program "Run Bootable Media Builder" Lewat start menu.
Start -> Programs -> Acronis -> Acronis Backup & Recovery 10*Bootable Components and Media Builder ->Run Bootable Media Builder

Setelah itu next, centang, next, next, (kalo ditanya jawab aja yes), karena kita pake flashdisk maka kita pilih Removable Disk, next, next, proceed. Selesai.

KETIGAX
Saatnya bikin MASTER.
Silakan juragan format harddisk agan, Install Ulang Windowsnya, terserah mau pake Windows XP Black Edition, Music Edition, Hentai Edition, terserah. Kalo ane lebih suka XP Perawan, yang VLK. Setelah install Windows, Install Program, dan JANGAN INSTALL DRIVER kalo masternya pengen dipake buat komputer laen. Kalo cuma untuk pribadi (komputer sendiri) install driver aja sekalian. Ga bisa install Windows ? Silakan tekan alt+f4

KEEMPAX
Master udah jadi, bootable device udah jadi, saatnya BACKUP.
Booting lewat flashdisk yg baru kita buat. Booting ada 2 pilihan :
1. Acronis Backup & Recovery 10
2. Continue OS Botting.

Silakan JANGAN pilih no. 2

Ditunggu.....

Ditunggu.....

Ditunggu.....

Ditunggu.....

Ditunggu.....

Selesai..... iss:
Silakan pilih Run Management Console JANGAN Pilih Reboot Apalagi TURN OFF

Setelah itu muncul interface Program. Pilih Backup.

Klick Change
 

Pilih yg mau Dibackup (c:) lalu OK

Klick Change

Pilih lokasi dan nama file hasil backup (d:\XPGue)

Klick Advanced view (ada di atas)

Klik Change

Pilih Maximum Untuk Compressions

Selesai, tinggal klik OK, Ok lagi Dan Ditunggu. Proses Backup Selesai.
Dan akhirnya

KLIMAXXXX
Sebelum lanjut ke KLIMAX Download Dulu Alat dan Bahan (yang kuat lokalin silakan )

Bersambung ..........................

KLIMAXXXX
RECOVER
Recover merupakan cara untuk menginstall komputer dari image yang sudah dibuat sebelumnya. Recover ini bisa digunakan pada SEMUA KOMPUTER yg TS coba
Caranya
Sama seperti pengen backup cuma pilih Recover di menu utama.

Click Change

Pilih File Image yg Mau Di Recover

Change Lagi

Tandai HANYA yg bawah jika anda mau install di komputer yg sebelumnya dah ada Windowsnya.
Tandai KEDUANYA jika anda install di harddisk baru.

Change Lage

Pilih Partisi tempat mau di Install Windowsnya. Biasanya Partisi yg ada (Pri,Act) nya.

Pilih Use Universal Restore. PENTING. KALO ADA MELOMPATI LANGKAH INI, OS GA BISA BOOTING ALIAS BSOD

Change Lagi

Pilih FOlder Tempat anda meng EXTRACT alat dan bahan yang di download di ATAS.

OK OK OK OK SAMPE SELESE.

ABIS. Ditunggu ampe selese dan Restart.

Thursday, November 22, 2012

Cara Membatasi Bandwidth Download Client dengan Firewall layer7 Protocols Mikrotik

Cara Membatasi Bandwidth Download Client dengan Firewall layer7 Protocols Mikrotik

Kali ini kita akan belajar membatasi download berdasarkan extension file yang di download menggunakan Firewall Layer 7. File-file yang di limit adalah yang ber extension  exe,flv,zip,rar,mp3,mp4,3gp dan lain lain, bisa juga anda tambahkan sendiri. Lalu, bagaimana cara setting nya ?? Berikut ini cara nya :
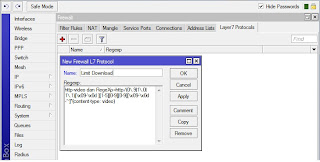
Buka winbox kemudian klik “ip” kemudian klik “firewall” kemudian klik tanda “plus” warna merah kemudian klik “layer7 protocols”
isikan
Name=Limit Download (isi terserah anda)

RegeXp=http/(0\.9|1\.0|1\.1)[\x09-\x0d ][1-5][0-9][0-9][\x09-\x0d -~]*(content-type: video)
lalu Buka “New terminal” di winbox
Copykan dan paste kan  kode di bawah ini dan patekan di “New Terminal” winbox
ip firewall layer7-protocol add comment=”” name=”Extension \” .exe \”” regexp=”\\.(exe)”
ip firewall layer7-protocol add comment=”” name=”Extension \” .rar \”” regexp=”\\.(rar)”
ip firewall layer7-protocol add comment=”” name=”Extension \” .zip \”” regexp=”\\.(zip)”
ip firewall layer7-protocol add comment=”” name=”Extension \” .7z \”” regexp=”\\.(7z)”
ip firewall layer7-protocol add comment=”” name=”Extension \” .cab \”” regexp=”\\.(cab)”
ip firewall layer7-protocol add comment=”” name=”Extension \” .asf \”” regexp=”\\.(asf)”
ip firewall layer7-protocol add comment=”” name=”Extension \” .mov \”” regexp=”\\.(mov)”
ip firewall layer7-protocol add comment=”” name=”Extension \” .wmv \”” regexp=”\\.(wmv)”
ip firewall layer7-protocol add comment=”” name=”Extension \” .mpg \”” regexp=”\\.(mpg)”
ip firewall layer7-protocol add comment=”” name=”Extension \” .mpeg \”” regexp=”\\.(mpeg)”
ip firewall layer7-protocol add comment=”” name=”Extension \” .mkv \”” regexp=”\\.(mkv)”
ip firewall layer7-protocol add comment=”” name=”Extension \” .avi \”” regexp=”\\.(avi)”
ip firewall layer7-protocol add comment=”” name=”Extension \” .flv \”” regexp=”\\.(flv)”
ip firewall layer7-protocol add comment=”” name=”Extension \” .wav \”” regexp=”\\.(wav)”
ip firewall layer7-protocol add comment=”” name=”Extension \” .rm \”” regexp=”\\.(rm)”
ip firewall layer7-protocol add comment=”” name=”Extension \” .mp3 \”” regexp=”\\.(mp3)”
ip firewall layer7-protocol add comment=”” name=”Extension \” .mp4 \”” regexp=”\\.(mp4)”
ip firewall layer7-protocol add comment=”” name=”Extension \” .ram \”” regexp=”\\.(ram)”
ip firewall layer7-protocol add comment=”” name=”Extension \” .rmvb \”” regexp=”\\.(rmvb)”
ip firewall layer7-protocol add comment=”” name=”Extension \” .dat \”” regexp=”\\.(dat)”
ip firewall layer7-protocol add comment=”” name=”Extension \” .daa \”” regexp=”\\.(daa)”
ip firewall layer7-protocol add comment=”” name=”Extension \” .iso \”” regexp=”\\.(iso)”
ip firewall layer7-protocol add comment=”” name=”Extension \” .nrg \”” regexp=”\\.(nrg)”
ip firewall layer7-protocol add comment=”” name=”Extension \” .bin \”” regexp=”\\.(bin)”
ip firewall layer7-protocol add comment=”” name=”Extension \” .vcd \”” regexp=”\\.(vcd)”
lanjutkan paste kan script mangle berikut :
/ip firewall mangle add action=mark-packet chain=prerouting comment=”http-video mark-packet” disabled=no layer7-protocol=http-video new-packet-mark=http-video passthrough=no
/ip firewall mangle add action=mark-connection chain=prerouting comment=”7z DOWNS” disabled=no layer7-protocol=”Extension \” .7z \”” new-connection-mark=”7z DOWNS” passthrough=yes protocol=tcp
/ip firewall mangle add action=mark-packet chain=postrouting comment=”” connection-mark=”7z DOWNS” disabled=no new-packet-mark=7z passthrough=no protocol=tcp
/ip firewall mangle add action=mark-connection chain=prerouting comment=”asf DOWNS” disabled=no layer7-protocol=”Extension \” .asf \”” new-connection-mark=”asf DOWNS” passthrough=yes protocol=tcp
/ip firewall mangle add action=mark-packet chain=postrouting comment=”” connection-mark=”asf DOWNS” disabled=no new-packet-mark=asf passthrough=no protocol=tcp
/ip firewall mangle add action=mark-connection chain=prerouting comment=”avi DOWNS” disabled=no layer7-protocol=”Extension \” .avi \”” new-connection-mark=”avi DOWNS” passthrough=yes protocol=tcp
/ip firewall mangle add action=mark-packet chain=postrouting comment=”” connection-mark=”avi DOWNS” disabled=no new-packet-mark=avi passthrough=no protocol=tcp
/ip firewall mangle add action=mark-connection chain=prerouting comment=”bin DOWNS” disabled=no layer7-protocol=”Extension \” .bin \”” new-connection-mark=”bin DOWNS” passthrough=yes protocol=tcp
/ip firewall mangle add action=mark-packet chain=postrouting comment=”” connection-mark=”bin DOWNS” disabled=no new-packet-mark=bin passthrough=no protocol=tcp
/ip firewall mangle add action=mark-connection chain=prerouting comment=”flv DOWNS” disabled=no layer7-protocol=”Extension \” .flv \”” new-connection-mark=”flv DOWNS” passthrough=yes protocol=tcp
/ip firewall mangle add action=mark-packet chain=postrouting comment=”” connection-mark=”flv DOWNS” disabled=no new-packet-mark=flv passthrough=no protocol=tcp
/ip firewall mangle add action=mark-connection chain=prerouting comment=”iso DOWNS” disabled=no layer7-protocol=”Extension \” .iso \”” new-connection-mark=”iso DOWNS” passthrough=yes protocol=tcp
/ip firewall mangle add action=mark-packet chain=postrouting comment=”” connection-mark= “iso DOWNS” disabled=no new-packet-mark=iso passthrough=no protocol=tcp
/ip firewall mangle add action=mark-connection chain=prerouting comment=”mkv DOWNS” disabled=no layer7-protocol=”Extension \” .mkv \”” new-connection-mark=”mkv DOWNS” passthrough=yes protocol=tcp
/ip firewall mangle add action=mark-packet chain=postrouting comment=”” connection-mark=”mkv DOWNS” disabled=no new-packet-mark=mkv passthrough=no protocol=tcp
/ip firewall mangle add action=mark-connection chain=prerouting comment=”exe DOWNS” disabled=no layer7-protocol=”Extension \” .exe \”” new-connection-mark=”exe DOWNS” passthrough=yes protocol=tcp
/ip firewall mangle add action=mark-packet chain=postrouting comment=”” connection-mark=”exe DOWNS” disabled=no new-packet-mark=exe passthrough=no protocol=tcp
/ip firewall mangle add action=mark-connection chain=prerouting comment=”mov DOWNS” disabled=no layer7-protocol=”Extension \” .mov \”” new-connection-mark=”mov DOWNS” passthrough=yes protocol=tcp
/ip firewall mangle add action=mark-packet chain=postrouting comment=”” connection-mark=”mov DOWNS” disabled=no new-packet-mark=mov passthrough=no protocol=tcp
/ip firewall mangle add action=mark-connection chain=prerouting comment=”mp3 DOWNS” disabled=no layer7-protocol=”Extension \” .mp3 \”” new-connection-mark=”mp3 DOWNS” passthrough=yes protocol=tcp
/ip firewall mangle add action=mark-packet chain=postrouting comment=”” connection-mark=”mp3 DOWNS” disabled=no new-packet-mark=mp3 passthrough=no protocol=tcp
/ip firewall mangle add action=mark-connection chain=prerouting comment=”mp4 DOWNS” disabled=no layer7-protocol=”Extension \” .mp4 \”” new-connection-mark=”mp4 DOWNS” passthrough=yes protocol=tcp
/ip firewall mangle add action=mark-packet chain=postrouting comment=”” connection-mark=”mp4 DOWNS” disabled=no new-packet-mark=mp4 passthrough=no protocol=tcp
/ip firewall mangle add action=mark-connection chain=prerouting comment=”mpeg DOWNS” disabled=no layer7-protocol=”Extension \” .mpeg \”” new-connection-mark=”mpeg DOWNS” passthrough=yes protocol=tcp
/ip firewall mangle add action=mark-packet chain=postrouting comment=”” connection-mark=”mpeg DOWNS” disabled=no new-packet-mark=mpeg passthrough=no protocol=tcp
/ip firewall mangle add action=mark-connection chain=prerouting comment=”mpg DOWNS” disabled=no layer7-protocol=”Extension \” .mpg \”” new-connection-mark=”mpg DOWNS” passthrough=yes protocol=tcp
/ip firewall mangle add action=mark-packet chain=postrouting comment=”” connection-mark=”mpg DOWNS” disabled=no new-packet-mark=mpg passthrough=no protocol=tcp
/ip firewall mangle add action=mark-connection chain=prerouting comment=”nrg DOWNS” disabled=no layer7-protocol=”Extension \” .nrg \”” new-connection-mark=”nrg DOWNS” passthrough=yes protocol=tcp
/ip firewall mangle add action=mark-packet chain=postrouting comment=”” connection-mark=”nrg DOWNS” disabled=no new-packet-mark=nrg passthrough=no protocol=tcp
/ip firewall mangle add action=mark-connection chain=prerouting comment=”ram DOWNS” disabled=no layer7-protocol=”Extension \” .ram \”” new-connection-mark=”ram DOWNS” passthrough=yes protocol=tcp
/ip firewall mangle add action=mark-packet chain=postrouting comment=”” connection-mark=”ram DOWNS” disabled=no new-packet-mark=ram passthrough=no protocol=tcp
/ip firewall mangle add action=mark-connection chain=prerouting comment=”rar DOWNS” disabled=no layer7-protocol=”Extension \” .rar \”” new-connection-mark=”rar DOWNS” passthrough=yes protocol=tcp
/ip firewall mangle add action=mark-packet chain=postrouting comment=”” connection-mark=”rar DOWNS” disabled=no new-packet-mark=rar passthrough=no protocol=tcp
/ip firewall mangle add action=mark-connection chain=prerouting comment=”rm DOWNS” disabled=no layer7-protocol=”Extension \” .rm \”” new-connection-mark=”rm DOWNS” passthrough=yes protocol=tcp
/ip firewall mangle add action=mark-packet chain=postrouting comment=”” connection-mark=”rm DOWNS” disabled=no new-packet-mark=rm passthrough=no protocol=tcp
/ip firewall mangle add action=mark-connection chain=prerouting comment=”rmvb DOWNS” disabled=no layer7-protocol=”Extension \” .rmvb \”” new-connection-mark=”rmvb DOWNS” passthrough=yes protocol=tcp
/ip firewall mangle add action=mark-packet chain=postrouting comment=”” connection-mark=”rmvb DOWNS” disabled=no new-packet-mark=rmvb passthrough=no protocol=tcp
/ip firewall mangle add action=mark-connection chain=prerouting comment=”wav DOWNS” disabled=no layer7-protocol=”Extension \” .wav \”” new-connection-mark=”wav DOWNS” passthrough=yes protocol=tcp
/ip firewall mangle add action=mark-packet chain=postrouting comment=”” connection-mark=”wav DOWNS” disabled=no new-packet-mark=wav passthrough=no protocol=tcp
/ip firewall mangle add action=mark-connection chain=prerouting comment=”wma DOWNS” disabled=no layer7-protocol=”Extension \” .wma \”” new-connection-mark=”wma DOWNS” passthrough=yes protocol=tcp
/ip firewall mangle add action=mark-packet chain=postrouting comment=”” connection-mark=”wma DOWNS” disabled=no new-packet-mark=wma passthrough=no protocol=tcp
/ip firewall mangle add action=mark-connection chain=prerouting comment=”wmv DOWNS” disabled=no layer7-protocol=”Extension \” .wmv \”” new-connection-mark=”wmv DOWNS” passthrough=yes protocol=tcp
/ip firewall mangle add action=mark-packet chain=postrouting comment=”” connection-mark=”wmv DOWNS” disabled=no new-packet-mark=wmv passthrough=no protocol=tcp
/ip firewall mangle add action=mark-connection chain=prerouting comment=”zip DOWNS” disabled=no layer7-protocol=”Extension \” .zip \”” new-connection-mark=”zip DOWNS” passthrough=yes protocol=tcp
/ip firewall mangle add action=mark-packet chain=postrouting comment=”” connection-mark=”zip DOWNS” disabled=no new-packet-mark=zip passthrough=no protocol=tcp
/ip firewall mangle add action=mark-connection chain=prerouting comment=”youtube DOWNS” disabled=no layer7-protocol=”YouTube ” new-connection-mark=”youtube DOWNS” passthrough=yes protocol=tcp
/ip firewall mangle add action=mark-packet chain=postrouting comment=”” connection-mark=”youtube DOWNS” disabled=no new-packet-mark=youtube passthrough=no protocol=tcp
/ip firewall mangle add action=mark-connection chain=prerouting comment=”daa DOWNS” disabled=no layer7-protocol=”Extension \” .daa \”” new-connection-mark=”daa DOWNS” passthrough=yes protocol=tcp
/ip firewall mangle add action=mark-packet chain=postrouting comment=”” connection-mark=”daa DOWNS” disabled=no new-packet-mark=daa passthrough=no protocol=tcp
/ip firewall mangle add action=mark-connection chain=prerouting comment=”dat DOWNS” disabled=no layer7-protocol=”Extension \” .dat \”” new-connection-mark=”dat DOWNS” passthrough=yes protocol=tcp
/ip firewall mangle add action=mark-packet chain=postrouting comment=”” connection-mark=”dat DOWNS” disabled=no new-packet-mark=dat passthrough=no protocol=tcp
/ip firewall mangle add action=mark-connection chain=prerouting comment=”vcd DOWNS” disabled=no layer7-protocol=”Extension \” .vcd \”” new-connection-mark=”vcd DOWNS” passthrough=yes protocol=tcp
/ip firewall mangle add action=mark-packet chain=postrouting comment=”” connection-mark=”vcd DOWNS” disabled=no new-packet-mark=vcd passthrough=no protocol=tcp
/ip firewall mangle add action=mark-connection chain=prerouting comment=”cab DOWNS” disabled=no layer7-protocol=”Extension \” .cab \”” new-connection-mark=”cab DOWNS” passthrough=yes protocol=tcp
/ip firewall mangle add action=mark-packet chain=postrouting comment=”” connection-mark=”cab DOWNS” disabled=no new-packet-mark=cab passthrough=no protocol=tcp
kemudian untuk limit nya di sini dibatasi hanya 32kB untuk limitnya berarti downloadnya hanya 8 KB perdetik,Jika anda menginginkan limit tambah silakan ganti sesuai dengan keinginan anda, misalnya 32k/32kanda gandi menjadi 64k/64k atau 128k/128k. Sesuaikan dengan Bandwitdh yang anda miliki. Copykan kode bawah ini dan patekan di “New Terminal” winbox.
queue simple add name=”youtube” dst-address=0.0.0.0/0 interface=all parent=none packet-marks=http-video direction=both priority=8 queue=default-small/default-small limit-at=0/0 max-limit=100k/100k burst-limit=0/0 burst-threshold=0/0 burst-time=0s/0s total-queue=default-small
queue simple add name=”exe” dst-address=0.0.0.0/0 interface=all parent=none packet-marks=exe direction=both priority=8 queue=default-small/default-small limit-at=0/0 max-limit=32k/32k burst-limit=0/0 burst-threshold=0/0 burst-time=0s/0s total-queue=default-small
queue simple add name=”rar” dst-address=0.0.0.0/0 interface=all parent=none packet-marks=rar direction=both priority=8 queue=default-small/default-small limit-at=0/0 max-limit=32k/32k burst-limit=0/0 burst-threshold=0/0 burst-time=0s/0s total-queue=default-small
queue simple add name=”zip” dst-address=0.0.0.0/0 interface=all parent=none packet-marks=zip direction=both priority=8 queue=default-small/default-small limit-at=0/0 max-limit=32k/32k burst-limit=0/0 burst-threshold=0/0 burst-time=0s/0s total-queue=default-small
queue simple add name=”7z” dst-address=0.0.0.0/0 interface=all parent=none packet-marks=7z direction=both priority=8 queue=default-small/default-small limit-at=0/0 max-limit=32k/32k burst-limit=0/0 burst-threshold=0/0 burst-time=0s/0s total-queue=default-small
queue simple add name=”cab” dst-address=0.0.0.0/0 interface=all parent=none packet-marks=cab direction=both priority=8 queue=default-small/default-small limit-at=0/0 max-limit=32k/32k burst-limit=0/0 burst-threshold=0/0 burst-time=0s/0s total-queue=default-small
queue simple add name=”asf” dst-address=0.0.0.0/0 interface=all parent=none packet-marks=asf direction=both priority=8 queue=default-small/default-small limit-at=0/0 max-limit=32k/32k burst-limit=0/0 burst-threshold=0/0 burst-time=0s/0s total-queue=default-small
queue simple add name=”mov” dst-address=0.0.0.0/0 interface=all parent=none packet-marks=mov direction=both priority=8 queue=default-small/default-small limit-at=0/0 max-limit=32k/32k burst-limit=0/0 burst-threshold=0/0 burst-time=0s/0s total-queue=default-small
queue simple add name=”wmv” dst-address=0.0.0.0/0 interface=all parent=none packet-marks=wmv direction=both priority=8 queue=default-small/default-small limit-at=0/0 max-limit=32k/32k burst-limit=0/0 burst-threshold=0/0 burst-time=0s/0s total-queue=default-small
queue simple add name=”mpg” dst-address=0.0.0.0/0 interface=all parent=none packet-marks=mpg direction=both priority=8 queue=default-small/default-small limit-at=0/0 max-limit=32k/32k burst-limit=0/0 burst-threshold=0/0 burst-time=0s/0s total-queue=default-small
queue simple add name=”mpeg” dst-address=0.0.0.0/0 interface=all parent=none packet-marks=mpeg direction=both priority=8 queue=default-small/default-small limit-at=0/0 max-limit=32k/32k burst-limit=0/0 burst-threshold=0/0 burst-time=0s/0s total-queue=default-small
queue simple add name=”mkv” dst-address=0.0.0.0/0 interface=all parent=none packet-marks=mkv direction=both priority=8 queue=default-small/default-small limit-at=0/0 max-limit=32k/32k burst-limit=0/0 burst-threshold=0/0 burst-time=0s/0s total-queue=default-small
queue simple add name=”avi” dst-address=0.0.0.0/0 interface=all parent=none packet-marks=avi direction=both priority=8 queue=default-small/default-small limit-at=0/0 max-limit=32k/32k burst-limit=0/0 burst-threshold=0/0 burst-time=0s/0s total-queue=default-small
queue simple add name=”flv” dst-address=0.0.0.0/0 interface=all parent=none packet-marks=flv direction=both priority=8 queue=default-small/default-small limit-at=0/0 max-limit=32k/32k burst-limit=0/0 burst-threshold=0/0 burst-time=0s/0s total-queue=default-small
queue simple add name=”wav” dst-address=0.0.0.0/0 interface=all parent=none packet-marks=wav direction=both priority=8 queue=default-small/default-small limit-at=0/0 max-limit=32k/32k burst-limit=0/0 burst-threshold=0/0 burst-time=0s/0s total-queue=default-small
queue simple add name=”rm” dst-address=0.0.0.0/0 interface=all parent=none packet-marks=rm direction=both priority=8 queue=default-small/default-small limit-at=0/0 max-limit=32k/32k burst-limit=0/0 burst-threshold=0/0 burst-time=0s/0s total-queue=default-small
queue simple add name=”mp3″ dst-address=0.0.0.0/0 interface=all parent=none packet-marks=mp3 direction=both priority=8 queue=default-small/default-small limit-at=0/0 max-limit=32k/32k burst-limit=0/0 burst-threshold=0/0 burst-time=0s/0s total-queue=default-small
queue simple add name=”mp4″ dst-address=0.0.0.0/0 interface=all parent=none packet-marks=mp4 direction=both priority=8 queue=default-small/default-small limit-at=0/0 max-limit=32k/32k burst-limit=0/0 burst-threshold=0/0 burst-time=0s/0s total-queue=default-small
queue simple add name=”ram” dst-address=0.0.0.0/0 interface=all parent=none packet-marks=ram direction=both priority=8 queue=default-small/default-small limit-at=0/0 max-limit=32k/32k burst-limit=0/0 burst-threshold=0/0 burst-time=0s/0s total-queue=default-small
queue simple add name=”rmvb” dst-address=0.0.0.0/0 interface=all parent=none packet-marks=rmvb direction=both priority=8 queue=default-small/default-small limit-at=0/0 max-limit=32k/32k burst-limit=0/0 burst-threshold=0/0 burst-time=0s/0s total-queue=default-small
queue simple add name=”dat” dst-address=0.0.0.0/0 interface=all parent=none packet-marks=dat direction=both priority=8 queue=default-small/default-small limit-at=0/0 max-limit=32k/32k burst-limit=0/0 burst-threshold=0/0 burst-time=0s/0s total-queue=default-small
queue simple add name=”daa” dst-address=0.0.0.0/0 interface=all parent=none packet-marks=daa direction=both priority=8 queue=default-small/default-small limit-at=0/0 max-limit=32k/32k burst-limit=0/0 burst-threshold=0/0 burst-time=0s/0s total-queue=default-small
queue simple add name=”iso” dst-address=0.0.0.0/0 interface=all parent=none packet-marks=iso direction=both priority=8 queue=default-small/default-small limit-at=0/0 max-limit=32k/32k burst-limit=0/0 burst-threshold=0/0 burst-time=0s/0s total-queue=default-small
queue simple add name=”nrg” dst-address=0.0.0.0/0 interface=all parent=none packet-marks=nrg direction=both priority=8 queue=default-small/default-small limit-at=0/0 max-limit=32k/32k burst-limit=0/0 burst-threshold=0/0 burst-time=0s/0s total-queue=default-small
queue simple add name=”bin” dst-address=0.0.0.0/0 interface=all parent=none packet-marks=bin direction=both priority=8 queue=default-small/default-small limit-at=0/0 max-limit=32k/32k burst-limit=0/0 burst-threshold=0/0 burst-time=0s/0s total-queue=default-small
queue simple add name=”vcd” dst-address=0.0.0.0/0 interface=all parent=none packet-marks=vcd direction=both priority=8 queue=default-small/default-small limit-at=0/0 max-limit=32k/32k burst-limit=0/0 burst-threshold=0/0 burst-time=0s/0s total-queue=default-small
—————————————————————————————
Setelah anda selesai settingan anda coba download dengan menggunakan IDM atau Speed Downloader yang lain, kemudian anda cek speed download nya, cek juga di queue simple mikrotik anda….
Selamat Mencoba
Capture Hasil Settingan :
Setting Layer 7
Mangle
Queue Simple
Selamat mencoba….


Kata kunci terkait dengan postingan :
software untuk mengatur bandwidthcara membatasi kuota internetmembatasi bandwidth tanpa softwaremengatur bandwidth internetcara membatasi koneksi internet lancara membatasi bandwidth youtubemengatur bandwidth tanpa mikrotikcara membatasi bandwidth lanmembatasi kecepatan wificara membatasi bandwidthcara membatasi kecepatan internet, cara membatasi kecepatan wifimengatur bandwidth tanpa software, cara membatasi kecepatan internet wifiaplikasi untuk mengatur bandwidthcara membatasi koneksi internet wificara membatasi kuota wifimembatasi bandwidth youtubecara membatasi internetcara membatasi koneksi wificara batasi kecepatan wifimengatur bandwidth youtubecara membatasi koneksi internet tanpa softwarecara membatsi pemakaian bandwicth internetaplikasi untuk membatasi kuota internet di pccara membatasi koneksi youtubemembatasi youtube dengan sofware, cara menurunkan koneksicara membatasi kuota download internetmempercepat koneksi jaringan lokalcara membatasi akses internetwifisoftware cek pemakai badwith internetcara membatasi bandwith youtubemembatasi kuota internet pada komputermembatasi kouta lanmembatasi kecepatan koneksi internetmembatasi kecepatan internet wifimembatasi kecepatan akses internetmengurangi kecepatan wifi userprogram untuk mengatur bandwidthsoftware untuk mengatur bandwich internetmembatasi akses internet pada jaringan lanmembatasi akses internet di jaringan, kecepatan bandwidth youtubecek pemakaian bandwidth dalam jaringan lancara untuk membatasi internet melalui wifimembatasi kuota internet tanpa software di windows 7, mengurangi kecepatan sharing koneksisoftware untuk cek bandwith di jaringan lokalmempercepat koneksi jaringan lan pada domainmembatasi kuota internet tanpa software di windows 8membatasi kuota internet tanpa software di windows 10

>